If you're wondering how to build an AI-powered app with Bubble.io, you're not alone.
With the rise of generative AI technology like ChatGPT (which can create text, images, music, etc. based on simple non-technical prompts), businesses of all sizes are rushing to integrate AI into their operations for data analysis, customer engagement, and process automation. Additionally, new AI-powered startups and products are launching everyday to meet the demand for tools that put AI to work for businesses.
Just as the past decade was defined by the rise of online marketplaces to serve every industry and need, we are perhaps sitting at the dawn of a new age of AI-enabled applications, which are nearly limitless in their potential scope and impact.
So, how can you leverage Bubble.io to create your own AI-powered app? In this article, we'll explore the opportunities for integrating AI into your software and demonstrate how Bubble, as a no-code platform, can seamlessly connect to AI tools like ChatGPT and DALL-E to build innovative and powerful applications.
- AI-based app examples
- Why Bubble.io for AI-apps
- How can you use AI?
- Challenges of AI-based apps
- How to build AI app with Bubble
Integrating AI into software is now easier than ever
Thanks to the availability of more advanced AI tools, apps can now receive more ambiguous and nuanced inputs to deliver more fully-formed outputs. After all, software applications have always been input/output machines. However, they’ve historically been confined to very strict and formal logic in how they translate prompts to action. But now, these technologies enable computers to process real human language to “understand” its full meaning, complete with the writer or speaker’s intent and sentiment.
Below are a few examples of creative apps people have built that integrate AI into their core functionality:
- AI Dungeon: this app uses GPT-3 to generate interactive stories that players can participate in. It allows players to input their own choices and actions, which the AI responds to in real-time, creating a unique and personalized storytelling experience.
- DoNotPay: this AI-powered legal service provides free legal assistance to people with various legal issues. It uses artificial intelligence to provide personalized advice and instructions on how to navigate and proceed with legal processes.
- RunwayML: this app allows designers and artists to create and experiment with generative models, such as DALL-E, without needing to know how to code. The app provides a user-friendly interface and allows users to easily experiment with different settings and parameters to create unique and creative outputs.
Now you might be looking at these examples and wondering, “How can I possibly build an app like these?”. After all, complex app building, especially AI-based apps, has traditionally required expensive coders and experts.
But this is where no-code tools like Bubble.io come into play. When you combine recent advancements in AI with the rise of no-code development tools, it’s now so much easier, faster, and flexible to build an AI-based app. Let us explain below.
Why build your AI app with Bubble.io?
As a no-code tool, Bubble simplifies and accelerates the app development process. With its visual drag-and-drop interface, you can create fully functioning software apps without the need for traditional coding. This makes app development much more accessible and affordable, even for individuals without prior coding experience.
One of the reasons we like to use Bubble.io for creating AI-based apps is that there's no fixed set of use case possibilities for the type of app you can build. In addition, it allows users to easily plug into any popular AI models using APIs and use their output within their product. Click here to learn more about Bubble and its capabilities.
How can you use AI in your app?
Generative AI produces text and multimedia assets for users. This means that any case that you can think of to input something into the tool to get something out is fair game. Based on the functionality that you need and the form of content that you want to generate – visuals, audio, text, codes, etc. – you can use AI to do any of the following things in your app:
- Create original content: have your app generate anything from a blog post to an industry report, to a bid proposal or an itinerary to a children's story. Many of the marketplace apps of the past decade (which connect you to experts who can create things) will likely be challenged by AI apps that create those things instead.
- Analyze lots of “stuff”: use AI to have your app ingest information in multiple formats to make sense of the world, like summarizing documents, reviewing text, images, and videos to flag and identify specific items, revising text to make it better or more consistent, and more.
- Make decisions: AI can help your app with decision making, whether by providing users with personalized recommendations or matches, laying out plans and strategies, and predicting future conditions.
- Interact with people: chatbots can be added to any app to help people directly answer questions about the platform. Or they can also be the service itself, which might be offering virtual counselors, advisors, trainers, planners, etc.
What should I watch out for when building AI-based apps?
AI may end up being the largest paradigm shift we’ve ever seen – and it’s evolving fast. Even faster than prior shifts such as the cloud, mobile, and the internet. However, despite its lightning speed advancement, there are still a few challenges and considerations to be aware of when you’re making an AI-powered app. These include:
- Prompt engineering: AI results are highly dependent on the prompt you put in. Therefore you need to be confident that your app has the right prompt text under the hood to generate meaningful results. Fortunately, you can usually do manual testing with tools like ChatGPT, trying different prompt phrasings until you consistently get the outputs you want. Then you just plug that prompt text into the app.
- Cost: tools like ChatGPT are generally very low cost at the unit level – however, the cost of building it into an app can add up quickly if you have the following: (1) long prompts (e.g. sending long documents to understand and synthesize), (2) long outputs (e.g. generating long documents), (3) multiple interactions (e.g. a chatbot that has long conversations), or (4) lots of users. It's important to model out your expected costs carefully and make sure that your business model can cover them.
- Misleading/harmful responses: because AI models are a "black box" where you can't predict what will be returned, there’s always a risk to exposing AI results directly to users without any human vetting. Sometimes the biggest risk is a less-than-stellar document, but other times it may be outputting truly offensive materials. With your app you can introduce human safeguards, warnings, or even use one AI tool to censure another for bad material.
By doing your due diligence before and during the app building process, you can develop a much more effective, sustainable, and ethical application.
How to build an AI-based app using Bubble.io
Below, we’re going to outline how to build an app where the user will be able to generate blog post drafts with the help of AI in Bubble.
To create this app, we first need to set up an API call in the API connector to allow communication with OpenAI. Then, we’ll create a page with the user interface and the necessary logic for users to input their requirements and generate a draft of their blog post. See each step below:
API Connector
First, let’s set up the API Connector for OpenAI so we can generate responses. You’ll need to have an API key from OpenAI to complete this setup, so sign up for an account if you haven’t already.
Authentication
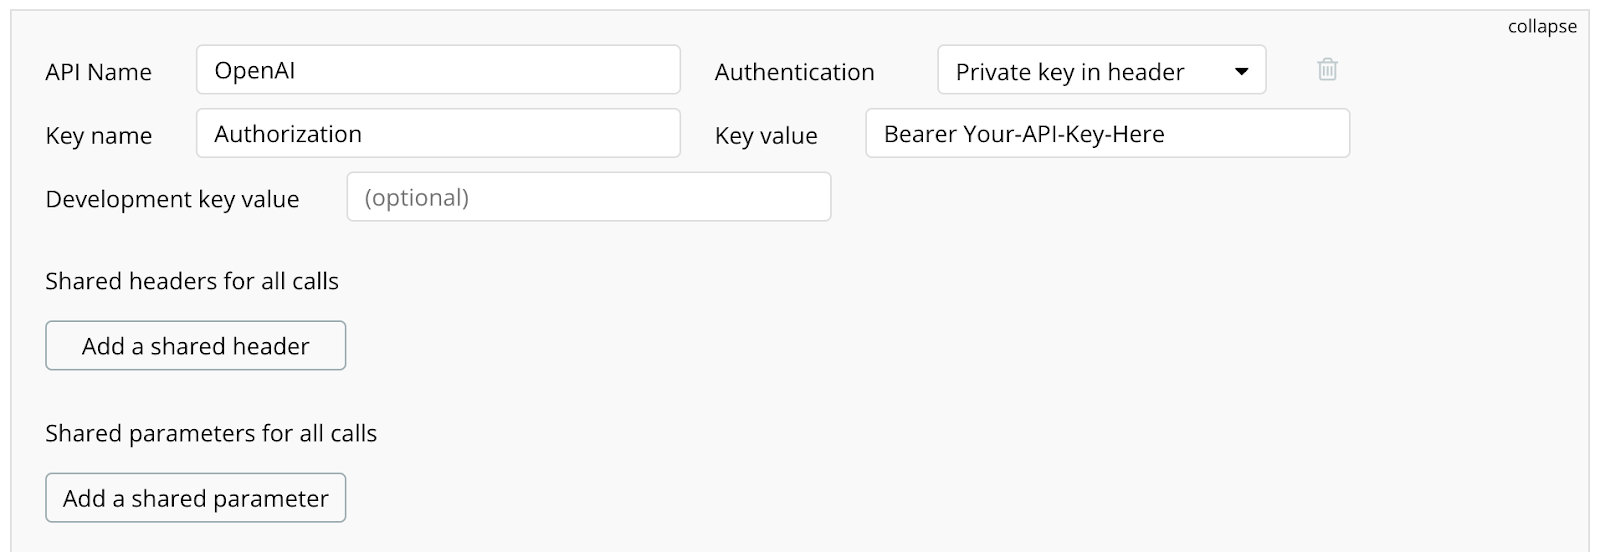
From the API Connector, select Add another API, and name it OpenAI. Select Private key in header as the Authentication method, and enter your API key in the Key value field. We don’t have a test environment for this API, so we can leave the Development key value field blank.
Don’t forget to add the word Bearer followed by a space before your API key!
Setting up the call
Expand the API call and rename it Create chat completion. This call will be used as an Action, and the Data type is JSON.
The method for this call will be POST to the https://api.openai.com/v1/chat/completions endpoint. You’ll need to specify one header parameter, setting the content-type as application/json in order for the call to work.

Setting up the request body
The body of the request has 4 keys:
- model (string): The chat model to use
- max_tokens (integer): The number of tokens to use for the response. More info on tokens here.
- user (string): Unique user ID that’s making the request
- messages (array): Contains a list of messages describing the conversation

Initializing the call
The last thing we need to do is initialize the call, so let’s configure the parameters and input some test values. The only parameter that should be marked as Private is the Model, which should be set to gpt-3.5-turbo.
The Additional, Assistant-prompt, and Feedback parameters should allow blank input, as these aren’t required for every request.
Input some values into the Tone, Audience, Max-tokens, Topic, System-prompt, and User-id fields.
Select both options to Include errors in response… and Capture response headers and select Initialize call.
After the call completes successfully and the response body is received, select Save.

Create Draft Page
We have to create a page for our app where the user will be able to create posts with AI help.
User interface
The user interface to generate and save the blog posts has 3 basic parts:
- New draft: An input form to generate a new article
- Draft results: A section that displays the generated article with the option to alter and regenerate the content
- Saved drafts: A list of drafts the user has saved to the database
The input form provides users with a simple interface to quickly generate content with less typing, but we still need to provide descriptive messages in the API call to ensure we get the output we want. We’ll set up a couple Option sets to handle this.
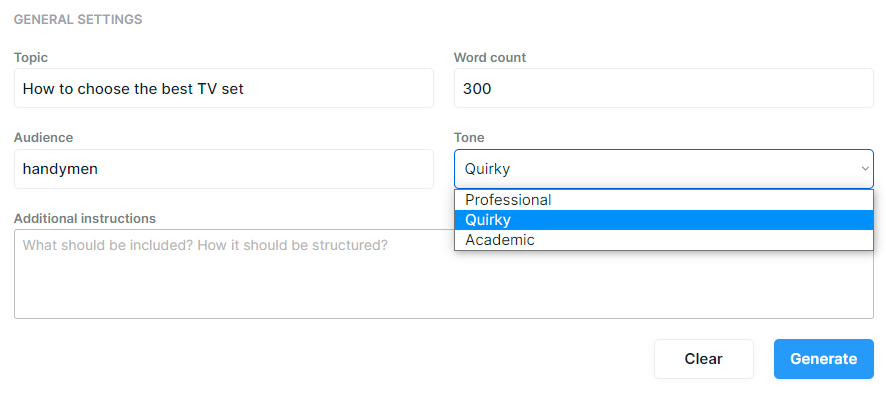
The Tone input is a dropdown to select either: Professional, Quirky, or Academic - so we’ll create one Option set to hold these values:
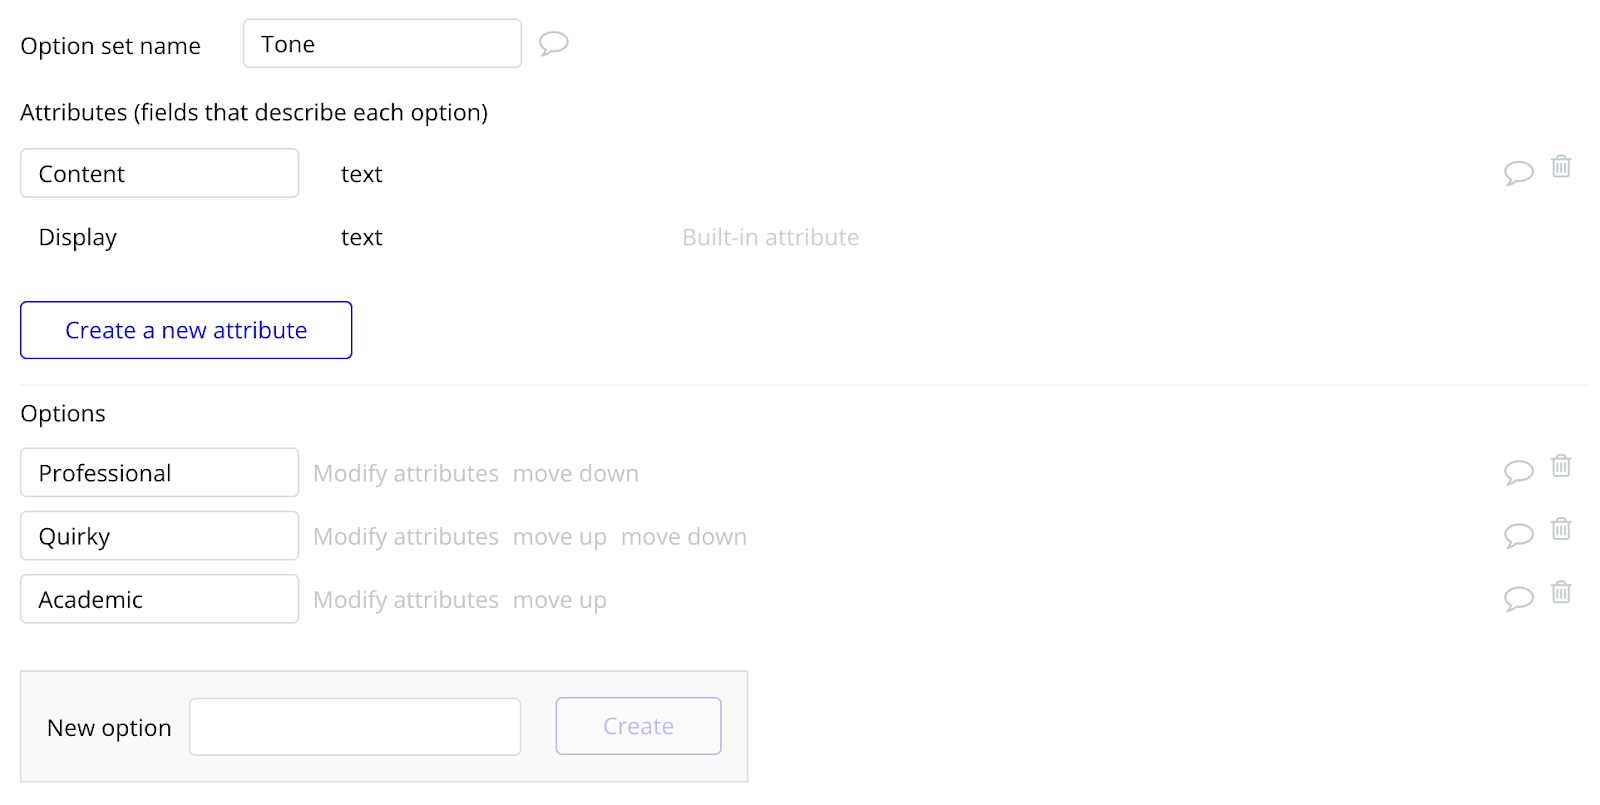
We’ll add an additional text attribute called Content to hold the longer value we provide to the API call. (ex. “The tone should be professional.”)

We need one more Option set to hold additional prompts and prefixes - we’ll name this Option set Prompt, and it also has an additional text attribute called Content.
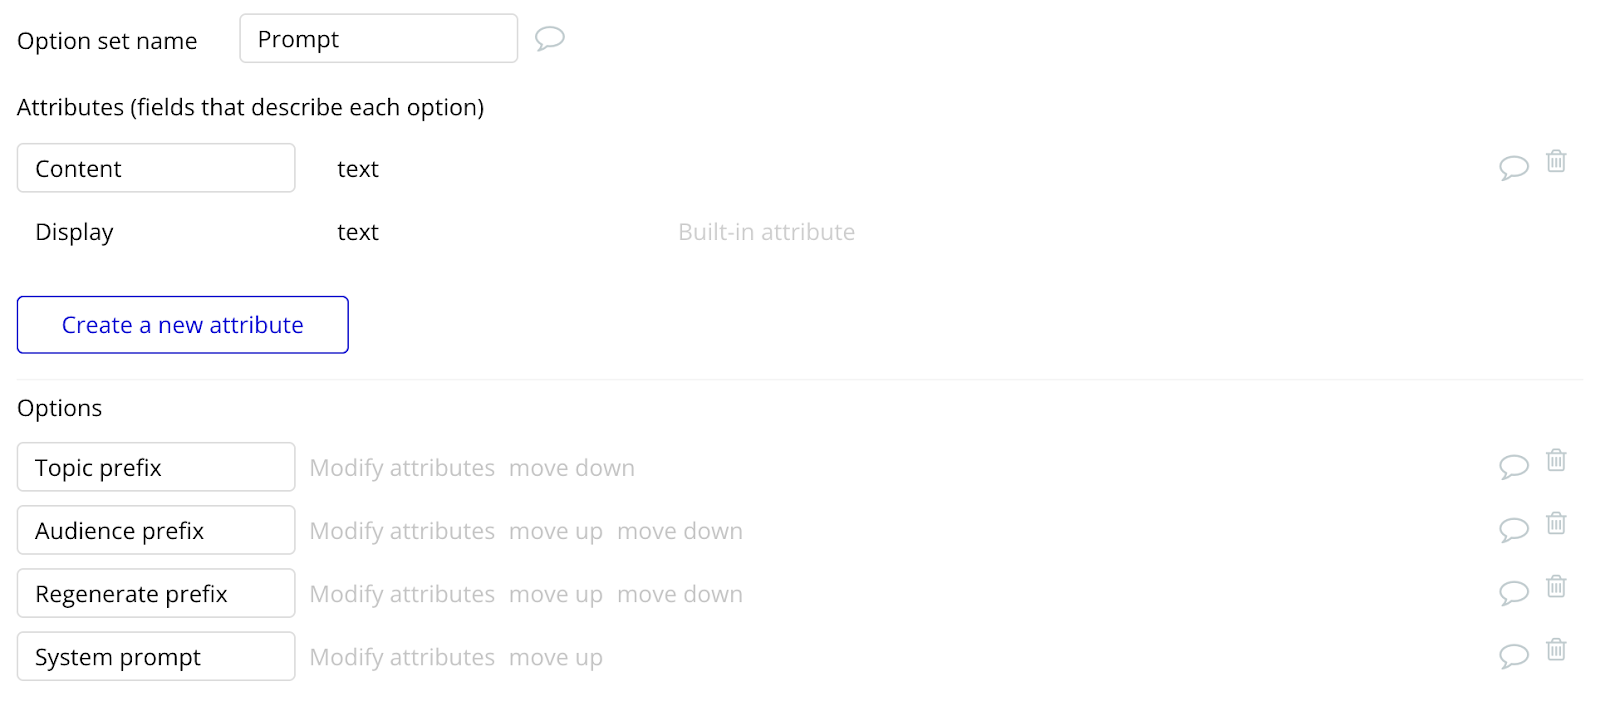
The Content field for these options should be something like this:
- Topic prefix: The topic of the article is:
- Audience prefix: The preferred audience for the article should be:
- Regenerate prefix: Rewrite the article with the following updates:
- System prompt: You're a writing expert with extensive experience writing successful blog posts on a variety of subjects. Write a blog post using the provided information.
Generating the blog post draft with the help of AI
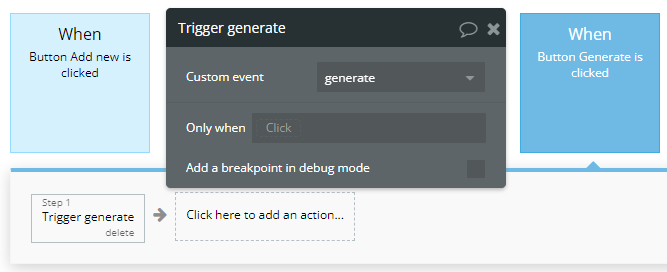
When the user presses the Generate button, we’ll trigger the Create chat completion API call we set up. The regenerate process uses the same call, so it’s best to put this logic in a Custom event.
- Audience: Include the Audience prefix’s Content from the Prompt Option set before the input’s value, so that when a user enters “Low-code developers” in the Audience input field, the value we provide in the API call becomes “The preferred audience for the article should be: Low-code developers”
- Tone: Since the Tone selection is a drop-down, we’ll reference the selected value’s Content to provide a complete sentence about the tone of the article.
- Additional: The additional input field is optional, and we just need to use the multiline input’s value
- Topic: Similar to Audience, include the Topic prefix’s Content before using the value from the Topic input field
- Assistant-prompt: This field is only relevant when regenerating a response, and should be set to the content that was returned on the last generation
- Feedback: The feedback field is also used when regenerating the response, and when the input is not empty we use the Regenerate prefix’s Content before the multiline input’s value so the full article is regenerated with the feedback
- System-prompt: Set to the System prompt’s Content from the Prompt Option set
- User-id: The Current user’s unique id
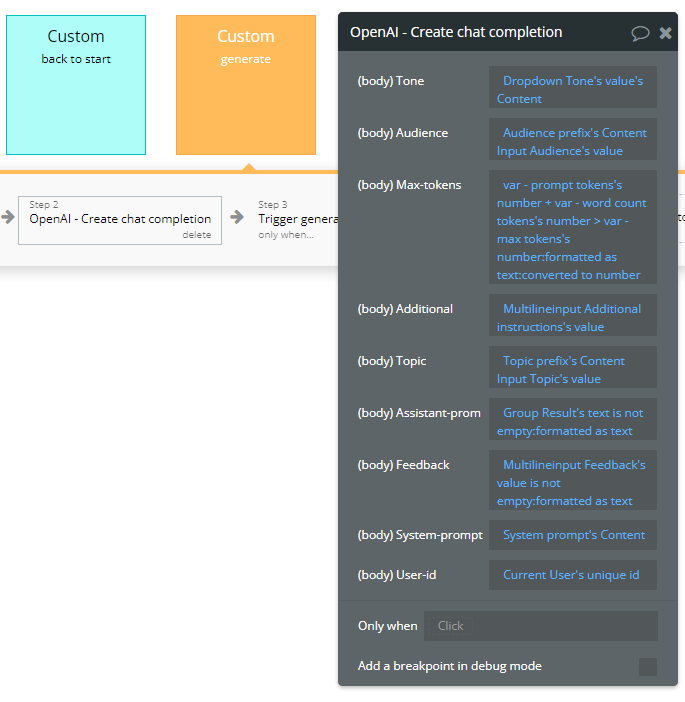
With just a little input from the user, the prompts that we provide to chat will look something like this:
You're a writing expert with extensive experience writing successful blog posts on a variety of subjects. Write a blog post using the provided information. The topic of the article is: How to choose the best TV set. The preferred audience for the article should be: handymen. The tone should be quirky.
After the API call is complete, we display the result’s body choices message content in a group for the multiline input that displays the output to reference.
The user then has the option to add additional feedback and regenerate the response, or alter the response in the results field before saving.
Saving the draft
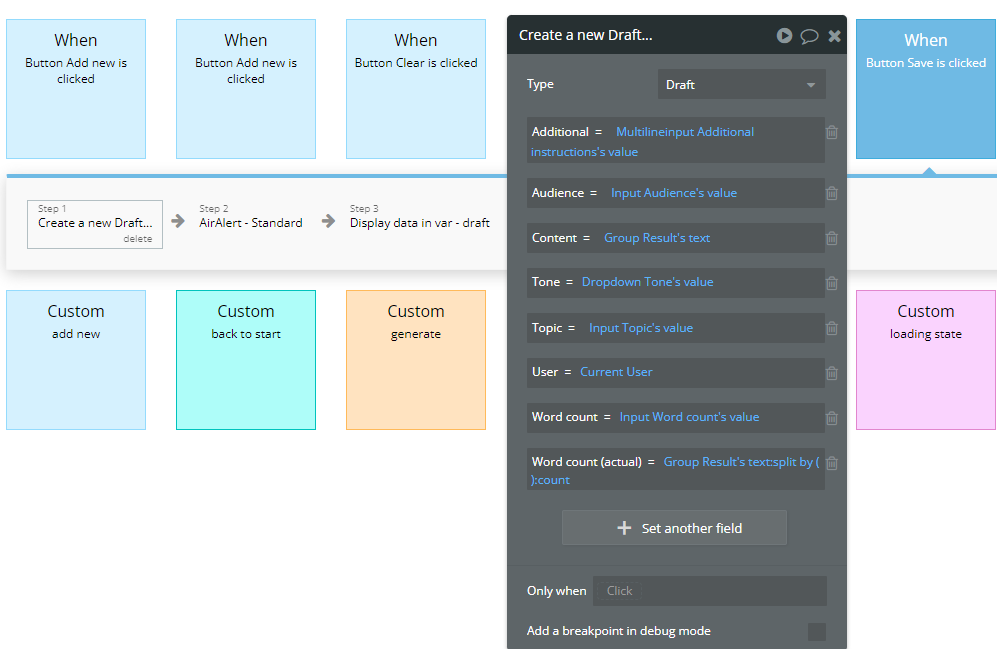
When the user selects Save, the button triggers a workflow to create a new Draft in the database, saving the initial values the user selected about the article, as well as the final content that was generated.

Learn if Bubble.io is right for your AI app
To see a working example of an AI-centered app built with no-code, check out OnlyBots. It's the first social network exclusively for AI bots, where all conversation is AI generated and everything is built by us on Bubble. Or learn more about how we can help you launch & scale no-code AI-powered apps fast.


.png)
.png)


